
Cat Wall™ Install
Orders come complete with an installation pack that contains the following:
2 Battens Per Tile
4 Fixings Per Batten
1 Drill Bit
1 Spirit Level
You will need a drill, medium size cross headed screwdriver & steel tape measure to install your Cat Wall™.
The fixing points on the battens are pre-drilled & it’s best to get a fixing through studs behind plasterboard - new holes can be drilled & countersunk through the battens if you need to set out Tiles to your own stud layout.
We recommend using 4 fixings per batten whether installing onto a plasterboard cavity, timber or masonry wall noting that you may need a specialist drill bit when drilling through a brick wall.

Please note that when setting out your Cat Wall™ there is some lateral adjustment in positioning when hanging Tiles - they can be hung off-centre up to 150mm left or right from the fixed battens, which can be a big help when fine tuning the batten layout for fixing into plasterboard studs

After you’ve set out & marked up the overall position of your Cat Wall™ start by installing the top panel batten noting that the battens are numbered - this is because the battens are cut down from longer lengths so won’t be identical in length or drill hole positions so start with #1 & work down.
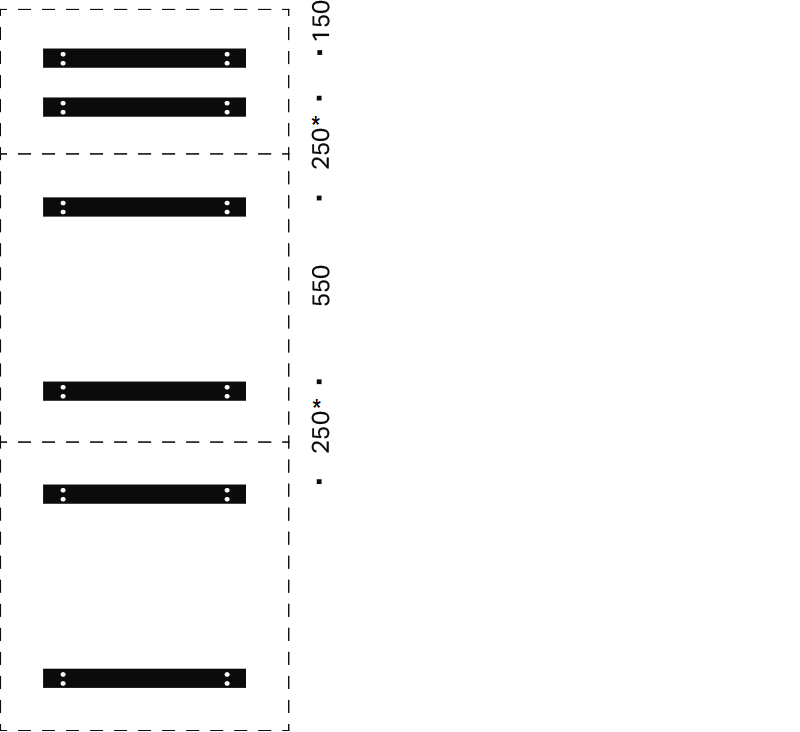
Install the battens for the remaining panels one-by-one below the top panel batten - battens on Tile are 550mm apart & Half Tiles are 150mm noting that the setting out dimension between bottom batten of a panel to the top batten of the panel below is usually between 250mm i.e. batten #2 to batten #3, but due to the varying thickness of the materials that wrap panels this can increase slightly so it’s best to lay the panels on on the floor, with Shelf frames between panels if applicable, then measure this distance whilst pressing the panels together to double check

If installing panels adjacent to each other set out the top panel battens first for each column & work down from these again in numbered batten order

Position the first batten for the top panel & level out using the spirit level

Mark-up the fixing hole positions through the batten

Drill fixing holes at least 35mm deep

Tap in the insert plugs making sure they are flush with the wall surface & then fix batten - always ensure that that the specific numbered batten used to mark up fixing holes is then fixed in place

Set-out the position of the second batten for the top panel by hanging a tap measure from the batten above

Mark-up the fixing hole positions

Drill fixing holes

Insert plugs & fix short batten

Repeat steps for the remaining panel battens measuring from the top batten

Assemble the Cat Wall™ from the bottom up making sure that both battens on each panel are located & locked together

Shelf hangers fit between panels & can be positioned at any point along the panels

Locate the grooves on the back of a Hard Shelf onto the sides of the hanger then work the front of the shelf over the front of the hanger to lock it into position - Soft Seat shelves should be wrapped around the hanger before it’s hung on the panel

To re-position a Hard Shelf release the front edge of the hanger then lift the back away from the panel - Soft Seat Shelves can be re-positioned without having to remove the felt seat

Panels can be hung upside down by refitting the battens on the back of the panel through 180° - as noted above the battens are not identical in terms of fixings hole locations so new counter sunk holes may need to be made to refix battens